(2번의 host 를 새롭게 추가 할경우)

  1. SSH 설정 및 1번의 ssh 설정 복사필요~ (AMBARI 설치 참고)

  2. Repoistery setting 추가, /etc/yum.repos.d/ 경로의 repo를 local repo로 재구성 필요(다른서버참고)
  3. data01 mount  ambari 설치 참고 (sdb1)


warning 해결 필요(질문)

      3. 2번서버의 JDK 설치 (/usr/jdk/   /usr/jdk64/ 경로에  기존 JDK 파일 복사 또는 yum install(?))

The following registered hosts have issues related to JDK


JDK not found at /usr/jdk64/jdk1.8.0_112/

       4. THP 이슈

The following hosts have Transparent Huge Pages (THP) enabled. THP should be disabled to avoid potential Hadoop performance issues.

Transparent Huge Pages


5.ntpd 이슈

The following services should be up

ntpd or chronyd

'spark,kafka,hadoop ecosystems > hotornworks-ambari' 카테고리의 다른 글

amabari - ssh 접속  (0) 2018.11.19
ambari 설치  (0) 2018.11.19

ssh 접속


cmd 열어서

window ssh 툴킷(?)설치

ex

ssh -p 3000 -D 1080 -q -C root@14.63.172.232

id/pw 치고


chrome 에 아래와 같이 ㅇ파라미터 입력

"C:\Program Files (x86)\Google\Chrome\Application\chrome.exe" swinno01:8080 --proxy-server="socks5://localhost:1080"   --host-resolver-rules="MAP * 0.0.0.0 , EXCLUDE localhost"   --user-data-dir=c:/temp

'spark,kafka,hadoop ecosystems > hotornworks-ambari' 카테고리의 다른 글

ambari host 수동 추가시 필요한 부분  (0) 2018.11.19
ambari 설치  (0) 2018.11.19

PTABLES 비활성화

서버간 통신을 위해 iptables 비활성화

# 서버 재기동시 iptable 실행 x
chkconfig iptables off
 
# 실행중인 iptables 종료
service iptables stop

SSH 설정

master node

ssh 공인키 생성

ssh-keygen -t rsa
slave node

root 디렉토리 아래 .ssh폴더를 생성한뒤 authorized_keys라는 파일을 만들어 master node의 id_rsa.pub파일 내용을 붙여넣는다.

AMBARI 설치

기본 설정

  1. slave node에 `authorized_keys` 파일 생성하고, 이 파일에 앞서 생성한 master node의 퍼블릭키 내용을 붙여넣기 한다.

    vim /root/.ssh/authorized_keys
    authorized_keys
    #master node의 public key 내용을 붙여넣기함.
    AAAAB3NzaC1yc2EAAAABIwAAAQEA2va8ON20pT/mMvCW9NAgIwYKM0/fq5tAZKYk
    ...생략...
  2. 디스크 설정

    authorized_keys
    mkfs -t ext4 /dev/xvdb mkdir /data01 mount /dev/xvdb /data01
  3. 마운트 자동 등록

    authorized_keys
    vim /etc/fstab
    fstab
    # 파일내용 끝에 아래 내용 추가
    /dev/xvdb /data01 ext4 noatime 0 0

JDK 설치

JDK 설치

java rpm 설치파일 다운로드


rpm 파일 설치

yum localinstall jdk-8-linux-x64.rpm

.bash_profile 파일 수정

vim .bash_profile # 파일 오픈
.bash_profile
# .bash_profile에 아래 내용 추가
export JAVA_HOME=/usr/java/jdk1.8.0_171-amd64
export SPARK_MAJOR_VERSION=2
변경 내용 적용
source .bash_profile


ulimit 설정

오픈 파일 개수 확인 후 높게 설정

#ulimit 확인
ulimit -Sn
#ulimit 10000으로 증가
ulimit -n 10000

NTP 설정

시간 동기화를 위해 ntp 를 설치 및 설정한다.

# 설치 확인
rpm -qa ntp
# 설치 안된 경우 설치
yum install ntp

설치 확인

[root@zetawiki ~]# whereis ntp
ntp: /etc/ntp /etc/ntp.conf
[root@zetawiki ~]# which ntpq
/usr/sbin/ntpq
[root@zetawiki ~]# which ntpdate
/usr/sbin/ntpdate
[root@zetawiki ~]# which ntpd
/usr/sbin/ntpd
[root@zetawiki ~]# service ntpd status
ntpd is stopped

AMBARI 설치

yum repository 설정

아래 링크를 참고하여 ambari버전과 os타입에 맞는 ambari yum repo 파일을 /etc/yum.repos.d/ambari.repo 경로에 복사

https://docs.hortonworks.com/HDPDocuments/Ambari-2.6.1.5/bkambari-installation/content/ambarirepositories.html

ambari 설치

yum install ambari-server

ambari setup

ambari-server setup
ambari 구동
ambari-server start

postgre sql

postgresql 설치

참고: https://www.postgresql.org/download/linux/redhat/

  • version 9.5
  • platform centos6
yum install https://download.postgresql.org/pub/repos/yum/9.5/redhat/rhel-6-x86_64/pgdg-centos95-9.5-3.noarch.rpm
yum install postgresql95 postgresql95-server
service postgresql-9.5 initdb
chkconfig postgresql-9.5 on
service postgresql-9.5 start


jdbc connector 설정

ambari master

jdbc connector 파일을 받아 설정.

wget https://jdbc.postgresql.org/download/postgresql-42.2.2.jar
ambari-server setup --jdbc-db=postgres --jdbc-driver=/postgresql-42.2.2.jar #파일 다운로드 경로


postgre 설치 서버

postgre.conf 설정 변경 (파일위치: /var/lib/pgsql/9.5/data/postgresql.conf)

#listen_address 설정을 아래와 같이 변경
listen_address='*'


pghba.conf 설정 변경 (파일위치: /var/lib/pgsql/9.5/data/pg_hba.conf)

#설정파일 제일 마지막 부분에 아래 설정 추가
host    hive            hive            0.0.0.0/0               md5
# root에서 hdfs 유저로 사용자 변경
su hdfs
# root 사용자가 접근 가능한 hdfs 폴더 생성
[hdfs@swinno01 resources]$ hadoop dfs -mkdir /user/root
[hdfs@swinno01 resources]$ hadoop dfs -chown root /user/root
[hdfs@swinno01 resources]$ hadoop dfs -ls /user/root

postgre - hive 설정

postgre 실행

  • sudo su postgres
  • psql -d postgres -U postgres

hive 사용자 생성

  • create user hive with password 'password';

hive database 생성

  • create database hive;

Ambari cluster 설정

클러스터 생성

로그인 후 나오는 첫 페이지에서 launch install wizard를 실행해 설치 마법사 실행

(그림1)

Get Started

클러스터 이름 설정

(그림2)

이름 : bigdata_mms

Select Version

상관없는 OS 관련 정보는 delete.

repository 주소를 설치한 repository url 로 변경(/etc/yum.repos.d/ambari-hdp-1.repo) 참고

  • http://bigdata07.mms.com/HDP-2.6-repo-1

  • http://bigdata07.mms.com/HDP-UTILS-1.1.0.22-repo-1

(그림3)

Install Options

host name 추가

ssh key(ambari master에서 생성한 private key 정보 입력)

(그림4)

host list

bigdata01.mms.com
bigdata02.mms.com
bigdata03.mms.com
bigdata04.mms.com
bigdata05.mms.com
bigdata06.mms.com
bigdata07.mms.com
bigdata08.mms.com
bigdata09.mms.com
bigdata10.mms.com

Confirm Hosts

기도

(그림5)

출처 : http://opt-lab.tistory.com/14


개미는 페로몬으로 길을 찾는다. 처음 가보는 길이더라도 동료들이 남긴 페로몬을 따라 먹이가 있는 곳까지 찾아간다. 뿐만 아니라 시간의 흐름에 따라 효율적으로 짧은 길을 찾아낸다. 개미가 지름길을 찾아낼 수 있는 것은 먼 거리의 경로 보다 짧은 거리의 경로에 상대적으로 같은 시간 안에 통과하는 개미가 더 많게되고, 더 많은 페로몬이 누적되기 때문이다. 아래는 시간의 흐름에 따라 개미가 짧은 길을 찾아내는 과정을 나타낸 그림이다.


장애물이 처음 나타났을 때 장애물을 돌아가는 양쪽 길 중 하나를 같은 확률로 선택한다면 더 짧은 경로에 더 많은 개미가 통과하게 되고 따라서 더 많은 페로몬이 누적되게된다. 시간의 흐름에 따라 긴 경로의 페로몬이 증발량이 누적량보다 많아지게 되면 점점 긴 경로를 선택하는 개미는 줄어들게 될 것이고 결국 짧은 경로만 선택되게 된다. 개미의 입장에서 보면 TSP문제가 아무것도 아닌 문제일 수도 있다.


Ant Colony Optimization은 이러한 개미의 습성을 모방한 Meta-Heuristic이다. Meta-Heuristic이란 Optimal에 근사한 답을 찾아낼 수 있는 Heuristic을 말한다. 보통 Optimal의 1~2%내외의 답을 찾아낼 수 있을 때 Meta-Heuristic이라고 할 수있다. 대표적인 Meta-Heuristic은 Genetic Algorithm, Simulated Anealing이 있다. 재미있는 것은 훌륭한 Meta-Heuristic은 대부분 자연을 모방해서 만들어졌다는 것이다.


Ant Colony Optimization을 얘기하려면 Ant Colony Optimization의 역사를 먼저 이야기 해야 하는데 Ant Colony System의 기원은 Ant System이다. Ant System은 1992년 Marco Dorigo가 창안해냈다. 그 후 Ant System을 몇 가지 개선시킨 Ant Colony System이 1997년(Gambardella Dorigo) 발표되었다. 그럼 먼저 Ant System을 알아보자.

Ant System은 간단하게 3단계로 나눌 수 있다.

Ant System
1. 개미들을 탐색시킨다.
2. 모든 개미가 탐색이 끝나면 각 arc의 페로몬을 업데이트 한다.
3. 개미가 찾은 해를 비교해서 현재의 best solution보다 더 나은 해일경우 best solution 업데이트.
종료 조건이 충족될 때 까지 1~3반복

Heristic의 특성상 Optimal을 찾았더라도 그 답이 Optimal인지 확인 할 수 없기 때문에 보통 종료 조건은 일정한 시간 혹은 iteration 동안 더 나은 해를 찾지 못하면 종료하도록 하거나 평균적인 solution의 값이 어떤 값으로 수렴하게되면 종료한다. 


Ant System에서 가장 중요한 것은 개미가 탐색할 때 다음 노드를 선택하는 기준이다. 개미의 습성을 구현하는 방법은 많겠지만 Ant System은 다음과 같은 확를 분포를 이용했다.


pi,j : 개미가 node i에서 node j로 이동할 확률
τi,j : arc i,j의 페로몬 양
ηi,j : arc i,j의 중요도. 보통 1/ci,j
S : 개미가 방문한 node
α, β : 파라미터


그러니까 arc의 페로몬의 양이 클 수록, arc의 cost가 작을 수록 그 arc를 선택할 확률이 높아지고 α, β의 값으로 각각 페로몬의 양에 비례할 강도와 arc cost에 반비례할 강도를 조절할 수 있다. 논문에서는 α=1, β=2를 사용했지만 꼭 정수일 필요는 없다. 개미가 방문한 노드들은 선택에서 제외시킴으로써 개미가 집으로 돌아오지 못하고 무한루프에 빠지는 경우를 막는다. 


그리고 Ant System의 페로몬 Update 방법은 다음과 같은 공식을 사용해 이루어 진다.


ρ : 파라미터. 페로몬의 증발비율. 0~1 사이의 값을 가진다.
ck : 개미k가 찾은 solution의 cost


Iteration마다 모든 arc의 페로몬을 일정비율 증가시키고, 개미가 이동한 arc에는 페로몬을 누적시키는 것이다. 주의깊게 보아야 할 부분은 페로몬의 양이 Iteration마다 ρ만큼씩 증발한다는 것이다. 즉, 개미가 그 arc를 지나가지 않으면 그 arc의 페로몬 값은 Iteration 횟수가 증가할 수록 0으로 수렴한다. 그리고 개미가 지나간 arc에 추가되는 페로몬의 양은 그 개미가 찾은 답의 비용에 반비례한다. 즉, 좋은 답을 찾은 개미일수록 더 많은 양의 페로몬을 남긴다.


Ant System의 특징은 각각의 개미가 arc를 선택하는 것이 다른 개미의 arc 선택에 영향을 주지 않는다는 것이다. 한번의 Iteration이 끝나야 페로몬이 업데이트 되기 때문이다. 또한 개미의 arc선택이 페로몬의 양과 arc의 cost에 영향을 받기는 하지만 기본적으로 Random한 선택이기 때문에 Iteration이 진행되어도 개미가 이전보다 더 나은 선택을 한다는 보장이 없다.


이런점을 보완한 것이 Ant Colony System이다. 아마도 Colony를 붙인 것은 개미간의 상호 작용을 반영했기 때문인 것 같다. 먼저 Ant System과 구분되는 Ant Colony System의 특징을 알아보자.


Ant Colony System
1. 개미가 다음 노드를 선택할 때, 확률적으로 Deterministic한 선택을 한다.
2. 개미가 arc를 선택해서 이동할 때 마다 페로몬의 값을 업데이트한다.
3. 개미들 중 제일 좋은 solution을 찾은 개미가 선택한 arc에 추가적인 페로몬을 누적시킨다.

자연의 개미가 길을 선택할 때 페로몬이 많은 길을 선택할 것은 자명한 일이다. 1번은 이점을 표현한 것이다. 그러니까 개미가 arc를 선택할 때 단순히 페로몬의 가장 많은 arc를 선택할 확률이 있다는 것이다. 이러한 선택은 다음과 같이 나타낼 수 있다.


deterministic node selectionequation 1
q0 : 파라미터. 개미가 Deterministic한 선택을 할 확률. 0~1 사이의 값을 가진다.
q : 0~1사이의 확률변수
 q ≥ q0라면 Ant System의 확률분포를 이용한 arc선택을 한다.


즉 q0확률로 개미는 주사위를 던지지 않고 본능에 충실하게 페로몬이 많은 길을 선택하는 것이다.


2번이 추가됨으로써 개미가 한 노드에서 다른 노드로 움직일 때 마다 페로몬을 업데이트(Local Step Update) 시키고 그 영향을 탐색중인 모든 개미들이 받게된다. 다음의 식을 이용해서 업데이트 한다.


local step pheromone updateequation 2
τ0 : 파라미터. 페로몬의 초기값. 보통 1/(N x Nearest Neighbor의 값)
φ : 파라미터. 페로몬의 Local Step 증발비율.


3번은 한 번의 Iteration이 끝난 후에 이루어진다.(Global Update) 다음과 같은 식을 이용해서 업데이트 한다.


best ant pheromone updateequation 3


3번을 보면 Neural Net의 신경망 학습과정과 매우 유사하다. 아무튼 전체 개미 중에서 가장 좋은 solution을 찾은 개미에게 자신의 tour에 페로몬을 남길 기회를 준다. 이렇게 함으로써 다음 Iteration에서 더 좋은 arc를 선택할 확률이 늘어나게되고 결과적으로 개미들에게 더 좋은 solution을 찾도록 유도한다.


지금까지 설명한 Ant Colony System을 정리하면 다음과 같다.
1. 개미들을 탐색시킨다.
1-1. 0~1사이의 난수를 발생시켜 q0보다 작으면 Deterministic한 선택을 한다.(1번 식)
1-2. 난수가 q0보다 크거나 같으면 Ant System과 같은 확를분포를 사용한 아크선택을 한다.
1-3. 개미들이 아크를 이동할 때마다 그 아크의 페로몬을 Local Step Update 시킨다. (2번 식)
2. 한 번의 Iteration이 끝나면 제일 좋은 solution을 찾은 개미의 tour에 페로몬을 Global Update한다. (3번 식)
3. 개미가 찾은 해를 비교해서 현재의 best solution보다 더 나은 해일경우 best solution 업데이트.
종료 조건이 충족될 때 까지 1~3반복


Ant Colony Optimization 알고리듬의 단점은 우선 파라미터 값들이 너무 많고 알고리듬이 파라미터에 너무 민감하게 반응한다는 것이다. 또 문제의 크기에 따라 파라미터 값들을 적절히 바꿔줘야 Optimal에 근사한 답을 찾아낸다. 파라미터를 고정시켜놓고 다양한 크기의 문제에 적용하면 solution의 질이 천차만별이다. 하지만 파라미터를 적절히 설정했을 때 optimal +1% 안밖의 답을 찾아냈다.


유의해야할 파라미터는 φ와 ρ이다. φ와 ρ는 페로몬 값이 0으로 수렴하는 속도를 결정한다. 너무 크게하면 좋은 경로를 놓치게 될 확률이 크고 너무 작게하면 더 좋은 답을 찾지 못하고 엉뚱한 방향으로 페로몬이 수렴하는 경향이 있다. 50 node의 문제에서 φ=0.02, ρ= 0.05로 했을 때 가장 좋은 결과를 얻었다.

다음은 50개의 랜덤하게 생성한 node의 문제에서 페로몬의 값과 best solution의 변화를 보여준다.


ant colony optimization progress

페로몬의 색깔은 상대적인 페로몬의 크기를 나타낸다.


'Algorithm' 카테고리의 다른 글

FDM vs FVM vs FEM  (0) 2021.01.04
kmeans - hadoop map-reduce 프로그래밍  (0) 2018.11.20
ML flow  (0) 2018.11.19

kafka 로그 설정

메시지가 브로커 컴퓨터에 보존되도록 구성하는 방법을 설정.

설정항목

  • log.segment.bytes : 바이트 단위로 최대 세그먼트 크기를 정의. 기본값은 1GB. 
    세그먼트 파일이 지정된 크기에 도달하면 새로운 세그먼트 파일이 생성됨. 토픽은 로그 디렉터리에 여러 세그먼트 파일로 저장되며, 토픽단위로 설정이 가능.
  • log.roll.{ms,hours} : 새로운 세그먼트 파일이 생성된 이후 크기한도에 도달하지 않았더라도 다음 파일로 넘어갈 시간 주기를 정의. 기본값은 7일, 토픽단위로 설정가능
  • log.cleanup.policy : delete 또는 compact로 설정하며 기본값은 delete. delete로 설정된 경우 로그 세그먼트는 시간이나 크기제한에 도달할 때 주기적으로 삭제됨.
    compact로 설정된 경우 불필요한 레코드를 없애기 위해 압축을 사용. 토픽단위로 설정 가능.
  • log.retention.{ms,minutes,hours} : 로그 세그먼트를 보유할 시간을 정의. 기본값은 7이며 토픽별로 정의 가능.
  • log.retention.bytes :  삭제하기 전에 보관할 파티션 당 로그 수. 기본값은 -1. 토픽별로 설정이 가능하며, 로그의 시간이나 크기제한에 도달하면 삭제됨.
  • log.retention.check.interval.ms : 로그의 보유 정책을 만족하기 위해 삭제할 대상을 확인하는 시간 주기. 기본값은 5분
  • log.cleaner.enable : 압축을 활성화 하려면 true로 설정
  • log.cleaner.threads : 로그의 압축을 위한 작업자 스레드 수를 지정.
  • log.cleaner.backoff.ms : 정리가 필요한 로그가 있는지 확인하는 주기
  • log.index.size.max.bytes : 바이트 단위로 오프셋 인덱스의 최대 크기를 설정. 기본값은 1GB. 토픽별로 설정 가능.
  • log.index.interval.byte : 새로운 항목이 오프셋 인덱스에 추가되는 주기. 기본값은 4096. 
    데이터를 가져오는 개별요청에서 브로커는 가져오기를 시작하고 끝낼 로그 내의 올바른 위치를 찾기 위한 바이트 수에 대해 일정하게 살펴본다.
    값을 높게 설정한 경우 인덱스 파일이 커지고 더 많은 메모리를 사용하게 되지만 검사하는 횟수는 줄어듬.
  • log.flush.interval.message : 디스크로 내보내기 전에 메모리에 보유할 메시지의 개수. 기본값은 922337036854775807. 확실하게 보유하는지 보장하는 것은 아니나, 알맞게 제어하도록 도와줌.
  • log.flush.interval.ms : 디스크로 내보내기 전에 메모리에 보유할 토픽 내의 메시지에 대한 최대 시간을 밀리초 단위로 설정.

참고


추가 로그 정책 관련 설명

ref: https://stackoverflow.com/questions/40369238/which-directory-does-apache-kafka-store-the-data-in-broker-nodes

ambari 기준으로 kafka 관련된 로그는 2군데에 저장 된다.

log.dirs : 메세지 보관을 위한 오프셋을 포함한 로그이다.

/var/log/kafka : kafka 자체 로그이며 kafka.env 파일에서 설정 할 수 있다.


1. Topic 에 관한 로그 는 아래 정책으로 log.dirs 경로(server.properties 파일에 설정) 에 저장된다.

로그의 잘려진 segment 는 상응하는 index 파일과 같이 저장된다.  그 파일 내임은 Base offset 을 표현하기도 한다.

이것을 설명하자면 log 파일 이저장되는 구조를 이해 해야하는데, 

log 파일은 실제메세지를 strucuted message format 으로 저장한다.  each message 는 처음 64 비트에 증가된 offset 을 포함한다.

그러므로 이파일에서 특정 오프셋의 메세지를 찾는것은 log 파일이 커질 수록 무거워진다.

또한 메세지를 공급하기 위해서는 브로커는 가장 나중의 offset 을 기억하고 메세지를 정확하게 받아들이기 위해 진행 시킨다.

그러므로 로그파일의 offset 기억하기 위해 index 파일이 존재한다. 

index 파일은 아래와 같은 항목을 저장한다.

  1. 4 Bytes: Relative Offset
  2. 4 Bytes: Physical Position

이때 파일내임은 base offset 을 표현한다. index 파일은 로그파일의 index.interval.bytes 의 단위마다 index 파일을 새로 쓴다.(default 4096)


2. kafka 서버자체의 로그 (INFO / ERROR / WARN 등) 은 kafka_env.sh 안에 로그 경로가 지정되어있다.

주로내용은 자바 info 로 채워지는데 이 또한 시간이 지나면 일주일에1~2G 정도 용량이 찬다.

log4j 설정을 이용해 로그양을 줄일 수 있다.  2번 은 말그대로 log 이다.


'spark,kafka,hadoop ecosystems > apache.kafka' 카테고리의 다른 글

kafka connect  (0) 2018.11.20
kafka vs flink vs esper vs storm vs spark  (0) 2018.11.20
kafka-개요  (0) 2018.11.20
Kafka Connector , Simple Connector 구현  (0) 2018.07.16
1. Kafka 설치 및 producer & Consumer test  (0) 2018.06.21

Window 에서 Java 서비스 등록을 위해서는 여러가지 방법이있다.

윈도우 서비스등록 후 JVM 환경에서 실행 시켜야 되는데, 

윈도우 서비스등록이 생각 보다 까다롭다.

단순히 sc 로 배치파일이나 java나 jar파일 등록이 되지 않는데,

어느곳에서도 서비스가 실행 되지 않는 정확한 이유를 설명해주지 않는다. (윈도우 프로그래밍 지식 부족ㅎㅎ)

또한 윈도우 서버마다 동작이 상이하다.

1.Apache Project  procrun project

  • JAVA 윈도우 실행을 위해 APPLICATION 을 싸주는 WRAPPER 프로젝트

    >> 결국 wrapper 를 APACHE 에서 요구 하는대로 따로 WRAPPER CLASS 를 따로 개발 하여야하고 원래 
    MAIN class 에서 돌아가는 것을 쓰레드 방식으로  구현 해야된다.
    이방식으로 만들고 적용 했는데... 정작 Window 2008 Server 에서 돌아가지않는상황에서 디버깅이 어려워.. 실패

2. JavaService.exe

인터넷에서 떠도는 JavaService.exe를 따운 받아 다른 블로그들을 참고하여 서비스 등록 >> 실패

64비트용 서비스 JavaService.exe 가 없는 것 같기도 하다.

3. nssm.exe

nssm-2.24.zip


reference : https://nssm.cc/


nssm-2.24.zi

이 파일의 압축을 풀고

window command 창을 실행시켜 32/64비트 경로로 간다.

nssm.exe install Kservice 를 입력하면, 아래와 같이 팝업이 뜬다.


나의 경우에는 PATH

PATH : C:\Program Files\Java\jre1.8.0_181\bin\java.exe 

이렇게 하면 리소스 모니터에   java.exe 로 잡히는데, 아래처럼 java.exe 를 다른이름으로 복사 붙여넣기 하여 원하는 이름으로 붙여넣고 실행 시킨다..


정리하자면

PATH : C:\Program Files\Java\jre1.8.0_181\bin\Kafkaagent.exe  

Startup directory : C\Program Files\Java\jre1.8.0_181\bin

Arguments : -Xmx256M -server -XX:+UseG1GC -XX:MaxGCPauseMillis=20 -XX:InitiatingHeapOccupancyPercent=35 -XX:+DisableExpli..(생략)

뒤에 JAVA 실행 옵션을 Argument 이런식으로 파라미터를  너어주고  서비스 시작 해보면 잘 된다. (드디어성공)

출처 : https://spark.apache.org/docs/latest/structured-streaming-programming-guide.html#output-modes


Programming Model

The key idea in Structured Streaming is to treat a live data stream as a table that is being continuously appended. This leads to a new stream processing model that is very similar to a batch processing model. You will express your streaming computation as standard batch-like query as on a static table, and Spark runs it as an incremental query on the unbounded input table. Let’s understand this model in more detail.

> Struct Streaming 의 idea 는  연속된 append 구조이다. 너는 스트리밍 계산을 노말한 batch query 형태로 계산 할 수 있을 것이다.

Basic Concepts

Consider the input data stream as the “Input Table”. Every data item that is arriving on the stream is like a new row being appended to the Input Table.

Stream as a Table

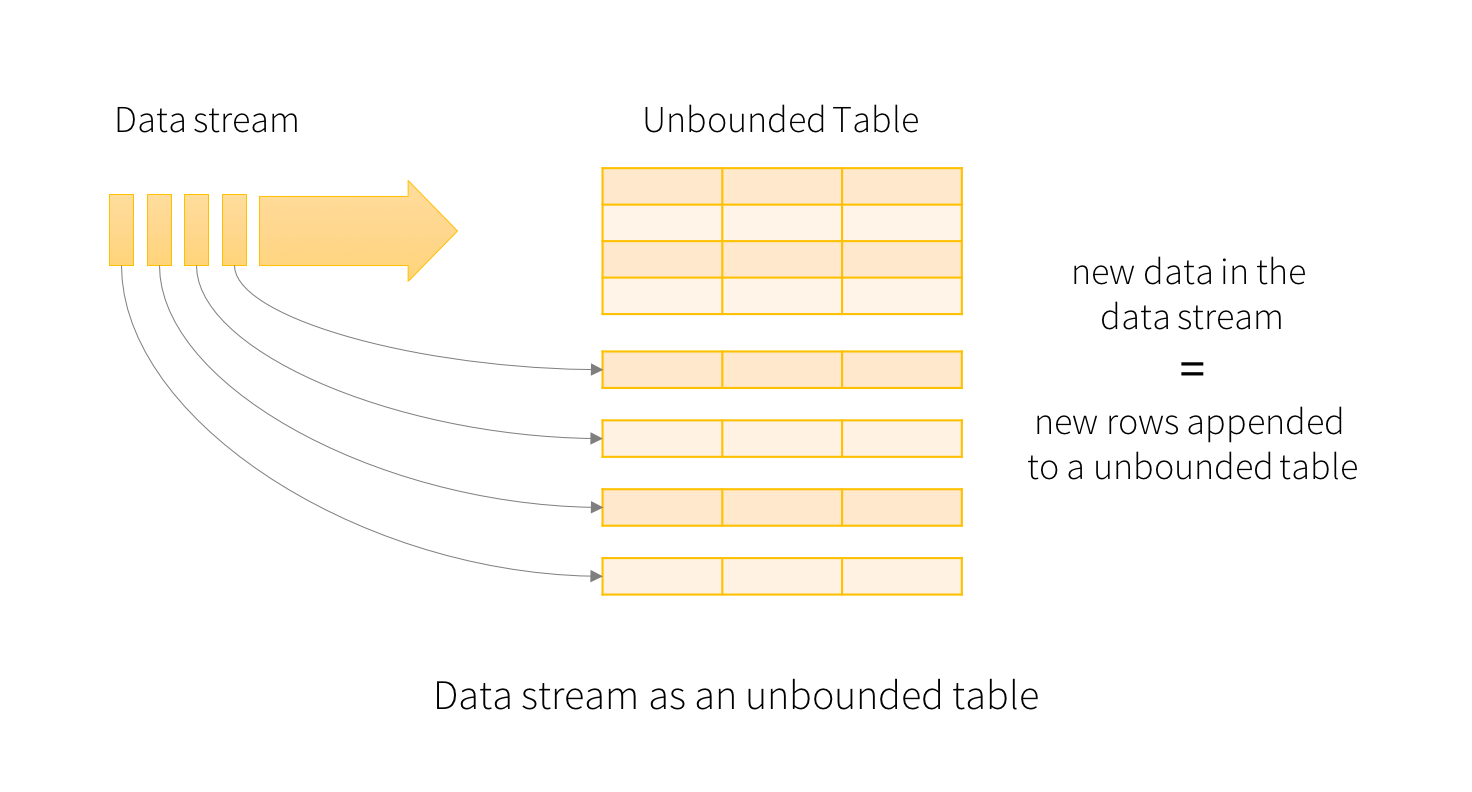
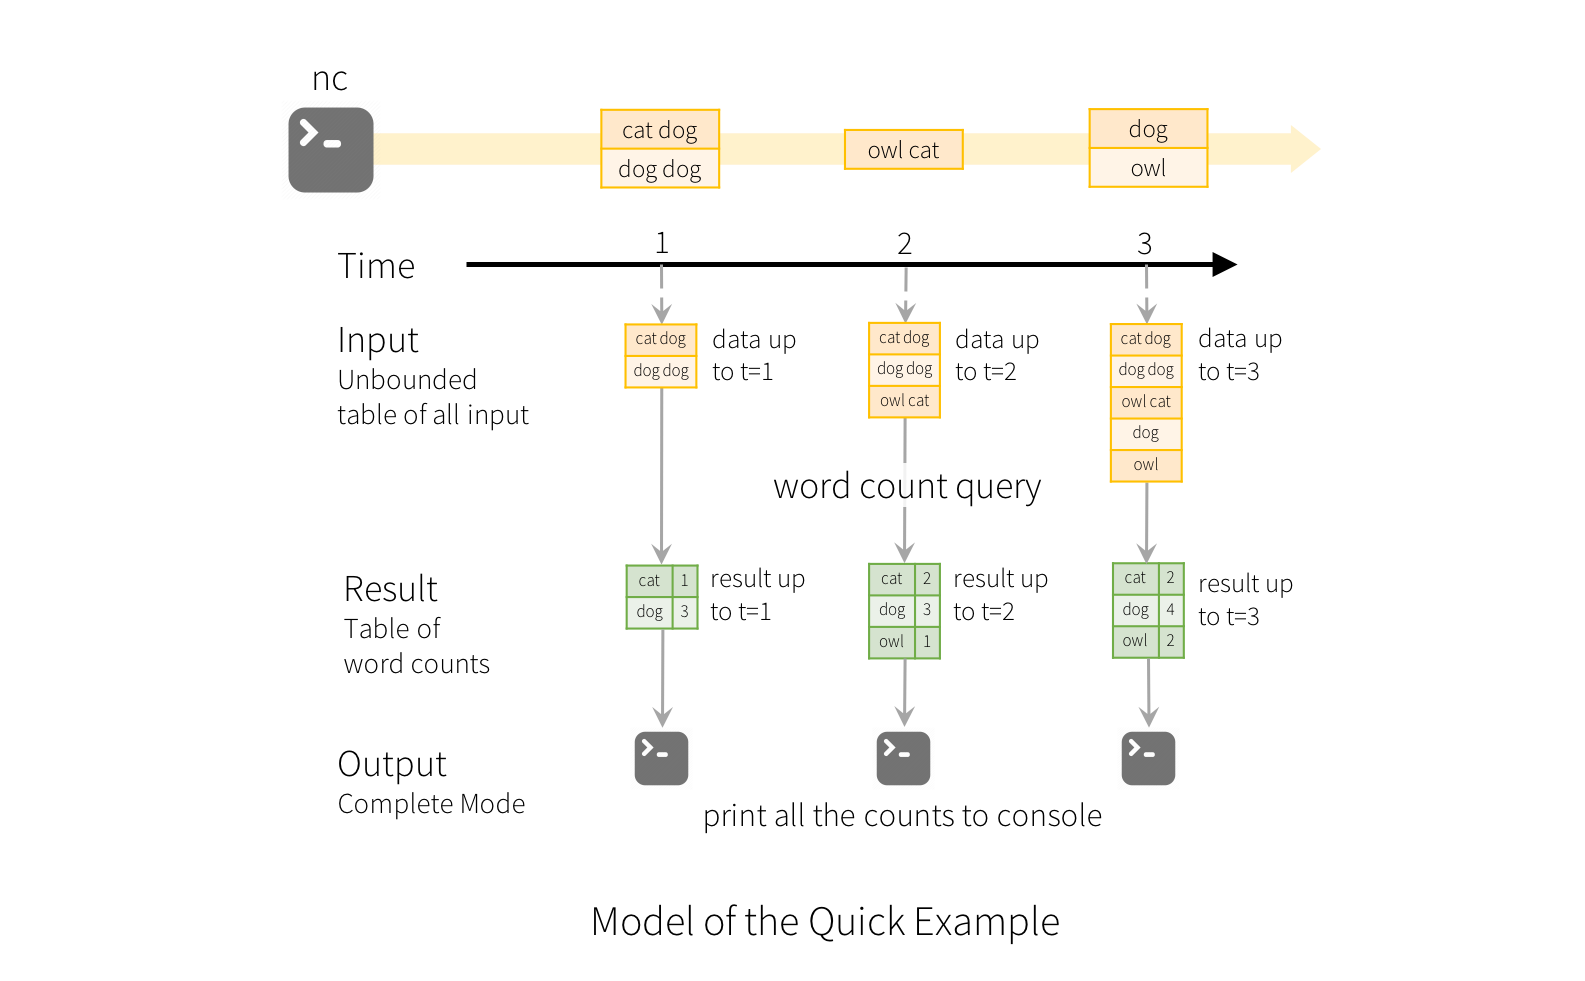
A query on the input will generate the “Result Table”. Every trigger interval (say, every 1 second), new rows get appended to the Input Table, which eventually updates the Result Table. Whenever the result table gets updated, we would want to write the changed result rows to an external sink.

Model

The “Output” is defined as what gets written out to the external storage. The output can be defined in a different mode:

  • Complete Mode - The entire updated Result Table will be written to the external storage. It is up to the storage connector to decide how to handle writing of the entire table.

  • Append Mode - Only the new rows appended in the Result Table since the last trigger will be written to the external storage. This is applicable only on the queries where existing rows in the Result Table are not expected to change.

  • Update Mode - Only the rows that were updated in the Result Table since the last trigger will be written to the external storage (available since Spark 2.1.1). Note that this is different from the Complete Mode in that this mode only outputs the rows that have changed since the last trigger. If the query doesn’t contain aggregations, it will be equivalent to Append mode.

Note that each mode is applicable on certain types of queries. This is discussed in detail later.

>> output mode 는 Complete mode / Append mode / Update 모드 3가지 가 있다.

Complete Mode 는 updated 된 Result Table 이 만들어졌을때졌을때,  외부 저장소에 출력된다. 

Append Mode 는 새로운 Rows 들만 Trigger 에 의해 외부저장소에 출력 된다.

Update Mode 란 새롭거나 수정된 Rows 들만 Trigger 에 의해 외부 저장소에 출력 된다. Completed 모드와 다른점은 만약 query 가 Aggregation 을 포함하지 않으면, 이것은 Append Mode 와 똑같이 똑같이 동작한다. (Complete 모드보다 빠를것으로 예상된다.)

To illustrate the use of this model, let’s understand the model in context of the Quick Example above. The first lines DataFrame is the input table, and the final wordCounts DataFrame is the result table. Note that the query on streaming lines DataFrame to generate wordCounts is exactly the same as it would be a static DataFrame. However, when this query is started, Spark will continuously check for new data from the socket connection. If there is new data, Spark will run an “incremental” query that combines the previous running counts with the new data to compute updated counts, as shown below.

>> 구현하자면  아래와같이 구현한다.

val query = wordCounts.writeStream
.outputMode("complete") or .outputMode("append") or .outputMode("update") 

>>  기존 SQL 과 똑같이 구현하는데, Spark 가 연속적으로 새로운 data 을 체킹한다. (socket 기반) 만약 새로운 Data 가 있으면 Spark 는 증가분에대해서 Query 를 날리게 되고 이전에 돌린 Running count 과 combine 하게 된다. (아래 그림 설명)

Model


Note that Structured Streaming does not materialize the entire table. It reads the latest available data from the streaming data source, processes it incrementally to update the result, and then discards the source data. It only keeps around the minimal intermediate state data as required to update the result 

>> % Struct Streaming 은 전체 Table 을 구체화 하지 않는다. 그것은 가장 마지막 사용가느한 data 를 읽고 점진적으로 Result 를 update하는 구조이다.

그리고 원본 source data 는 지우게된다. 이것은 가능한 가장 작은 data 를 유지하는데 그것을 state Data 라한다. Result 를 업데이트하기위한 것이 state Data 이기도 하다.

Basic Operations - Selection, Projection, Aggregation

Most of the common operations on DataFrame/Dataset are supported for streaming. The few operations that are not supported are discussed laterin this section.

>> 기본적인 select 등의  Query 를 아래와 같이 지원한다. 다만 몇 몇개는 지원하지 않는다.

case class DeviceData(device: String, deviceType: String, signal: Double, time: DateTime)
 
val df: DataFrame = ... // streaming DataFrame with IOT device data with schema { device: string, deviceType: string, signal: double, time: string }
val ds: Dataset[DeviceData] = df.as[DeviceData]    // streaming Dataset with IOT device data
 
// Select the devices which have signal more than 10
df.select("device").where("signal > 10")      // using untyped APIs
ds.filter(_.signal > 10).map(_.device)         // using typed APIs
 
// Running count of the number of updates for each device type
df.groupBy("deviceType").count()                          // using untyped API
 
// Running average signal for each device type
import org.apache.spark.sql.expressions.scalalang.typed
ds.groupByKey(_.deviceType).agg(typed.avg(_.signal))    // using typed API
Note, you can identify whether a DataFrame/Dataset has streaming data or not by using df.isStreaming.


 unsupported Operation

Schema inference and partition of streaming DataFrames/Datasets

By default, Structured Streaming from file based sources requires you to specify the schema, rather than rely on Spark to infer it automatically. This restriction ensures a consistent schema will be used for the streaming query, even in the case of failures. For ad-hoc use cases, you can reenable schema inference by setting spark.sql.streaming.schemaInference to true.

Partition discovery does occur when subdirectories that are named /key=value/ are present and listing will automatically recurse into these directories. If these columns appear in the user provided schema, they will be filled in by Spark based on the path of the file being read. The directories that make up the partitioning scheme must be present when the query starts and must remain static. For example, it is okay to add /data/year=2016/ when /data/year=2015/ was present, but it is invalid to change the partitioning column (i.e. by creating the directory /data/date=2016-04-17/).

>> default 로 Struct Streaming 은 input schema 를 제시하여 입력 받도록 한다. (CSV 의 경우 지원하는데 JSON 은?? kafka 는? )

 여기를 클릭하여 펼치기...


Basic Operation (like dataframe)


case class DeviceData(device: String, deviceType: String, signal: Double, time: DateTime)

val df: DataFrame = ... // streaming DataFrame with IOT device data with schema { device: string, deviceType: string, signal: double, time: string }
val ds: Dataset[DeviceData] = df.as[DeviceData]    // streaming Dataset with IOT device data

// Select the devices which have signal more than 10
df.select("device").where("signal > 10")      // using untyped APIs 
ds.filter(_.signal > 10).map(_.device)         // using typed APIs

// Running count of the number of updates for each device type
df.groupBy("deviceType").count()                          // using untyped API

// Running average signal for each device type
import org.apache.spark.sql.expressions.scalalang.typed
ds.groupByKey(_.deviceType).agg(typed.avg(_.signal))    // using typed API


2.3.0 부터 지원된다.,

(IPC - 2.2.0 , EPC 2.3.0)

Support matrix for joins in streaming queries
Left InputRight InputJoin Type
StaticStaticAll typesSupported, since its not on streaming data even though it can be present in a streaming query
StreamStaticInnerSupported, not stateful
Left OuterSupported, not stateful
Right OuterNot supported
Full OuterNot supported
StaticStreamInnerSupported, not stateful
Left OuterNot supported
Right OuterSupported, not stateful
Full OuterNot supported
StreamStreamInnerSupported, optionally specify watermark on both sides + time constraints for state cleanup
Left OuterConditionally supported, must specify watermark on right + time constraints for correct results, optionally specify watermark on left for all state cleanup
Right OuterConditionally supported, must specify watermark on left + time constraints for correct results, optionally specify watermark on right for all state cleanup
Full OuterNot supported
import org.apache.spark.sql.functions.expr
 
val impressions = spark.readStream. ...
val clicks = spark.readStream. ...
 
// Apply watermarks on event-time columns
val impressionsWithWatermark = impressions.withWatermark("impressionTime""2 hours")
val clicksWithWatermark = clicks.withWatermark("clickTime""3 hours")
 
// Join with event-time constraints
impressionsWithWatermark.join(
  clicksWithWatermark,
  expr("""
    clickAdId = impressionAdId AND
    clickTime >= impressionTime AND
    clickTime <= impressionTime + interval 1 hour
    """)
)
 
 
impressionsWithWatermark.join(
  clicksWithWatermark,
  expr("""
    clickAdId = impressionAdId AND
    clickTime >= impressionTime AND
    clickTime <= impressionTime + interval 1 hour
    """),
  joinType = "leftOuter"      // can be "inner", "leftOuter", "rightOuter"
 )


정리하자면, STREAM - STREAM JOIN 에서 INNER 조인은 watermark 가 옵셔날이지만 의미적으로도 써주는것이 좋고 성능도개선된다.

OUTER 조인은 Watermark 가 필수인데 ,그이유는 마지막까지 조인할 대상을 찾고 기다리기 때문에,  만약 null 일 경우 delay time 은 최대가된다.


  • Joins can be cascaded, that is, you can do df1.join(df2, ...).join(df3, ...).join(df4, ....).

  • As of Spark 2.3, you can use joins only when the query is in Append output mode. Other output modes are not yet supported.

  • As of Spark 2.3, you cannot use other non-map-like operations before joins. Here are a few examples of what cannot be used.

    • Cannot use streaming aggregations before joins.

    • Cannot use mapGroupsWithState and flatMapGroupsWithState in Update mode before joins.


  1. deduplication

    / Without watermark using guid column
    streamingDf.dropDuplicates("guid")
     
    // With watermark using guid and eventTime columns
    streamingDf
      .withWatermark("eventTime""10 seconds")
      .dropDuplicates("guid""eventTime")

    watermark - watermark 까지 (참고로 이전 date 는 중복제거가 안 될 수 있음)
    without - sate 되는대까지

  2. Arbitary State
    Since Spark 2.2, this can be done using the operation mapGroupsWithState and the more powerful operation flatMapGroupsWithState. Both operations allow you to apply user-defined code on grouped Datasets to update user-defined state. For more concrete details, take a look at the API documentation (Scala/Java) and the examples (Scala/Java).
    위의 Operation 은 유저가원하는(임의의) state 를 만든다. 다만 그 State 가 어떻게 활용되는지는 별이야기가없다.

     3. Unsupported!

Unsupported Operations

There are a few DataFrame/Dataset operations that are not supported with streaming DataFrames/Datasets. Some of them are as follows.

  • Multiple streaming aggregations (i.e. a chain of aggregations on a streaming DF) are not yet supported on streaming Datasets.

  • Limit and take first N rows are not supported on streaming Datasets.

  • Distinct operations on streaming Datasets are not supported.

  • Sorting operations are supported on streaming Datasets only after an aggregation and in Complete Output Mode.

  • Few types of outer joins on streaming Datasets are not supported. See the support matrix in the Join Operations section for more details.

In addition, there are some Dataset methods that will not work on streaming Datasets. They are actions that will immediately run queries and return results, which does not make sense on a streaming Dataset. Rather, those functionalities can be done by explicitly starting a streaming query (see the next section regarding that).

  • count() - Cannot return a single count from a streaming Dataset. Instead, use ds.groupBy().count() which returns a streaming Dataset containing a running count.

  • foreach() - Instead use ds.writeStream.foreach(...) (see next section).

  • show() - Instead use the console sink (see next section).


val query = df.writeStream.format("console").start()   // get the query object
 
query.id          // get the unique identifier of the running query that persists across restarts from checkpoint data
 
query.runId       // get the unique id of this run of the query, which will be generated at every start/restart
 
query.name        // get the name of the auto-generated or user-specified name
 
query.explain()   // print detailed explanations of the query
 
query.stop()      // stop the query
 
query.awaitTermination()   // block until query is terminated, with stop() or with error
 
query.exception       // the exception if the query has been terminated with error
 
query.recentProgress  // an array of the most recent progress updates for this query
 
query.lastProgress    // the most recent progress update of this streaming query


val spark: SparkSession = ...
 
spark.streams.active    // get the list of currently active streaming queries
 
spark.streams.get(id)   // get a query object by its unique id
 
spark.streams.awaitAnyTermination()   // block until any one of them terminates


Query Type
Supported Output ModesNotes
Queries with aggregationAggregation on event-time with watermarkAppend, Update, CompleteAppend mode uses watermark to drop old aggregation state. But the output of a windowed aggregation is delayed the late threshold specified in `withWatermark()` as by the modes semantics, rows can be added to the Result Table only once after they are finalized (i.e. after watermark is crossed). See the Late Data section for more details. 

Update mode uses watermark to drop old aggregation state. 

Complete mode does not drop old aggregation state since by definition this mode preserves all data in the Result Table.
Other aggregationsComplete, UpdateSince no watermark is defined (only defined in other category), old aggregation state is not dropped. 

Append mode is not supported as aggregates can update thus violating the semantics of this mode.
Queries with mapGroupsWithStateUpdate
Queries with flatMapGroupsWithStateAppend operation modeAppendAggregations are allowed after flatMapGroupsWithState.
Update operation modeUpdateAggregations not allowed after flatMapGroupsWithState.
Queries with joinsAppendUpdate and Complete mode not supported yet. See the support matrix in the Join Operations section for more details on what types of joins are supported.
Other queriesAppend, UpdateComplete mode not supported as it is infeasible to keep all unaggregated data in the Result Table.
Output Sinks
There are a few types of built-in output sinks.
File sink - Stores the output to a directory.
 
writeStream
    .format("parquet")        // can be "orc", "json", "csv", etc.
    .option("path""path/to/destination/dir")
    .start()
Kafka sink - Stores the output to one or more topics in Kafka.
 
writeStream
    .format("kafka")
    .option("kafka.bootstrap.servers""host1:port1,host2:port2")
    .option("topic""updates")
    .start()
Foreach sink - Runs arbitrary computation on the records in the output. See later in the section for more details.
 
writeStream
    .foreach(...)
    .start()
Console sink (for debugging) - Prints the output to the console/stdout every time there is a trigger. Both, Append and Complete output modes, are supported. This should be used for debugging purposes on low data volumes as the entire output is collected and stored in the driver’s memory after every trigger.
 
writeStream
    .format("console")
    .start()
Memory sink (for debugging) - The output is stored in memory as an in-memory table. Both, Append and Complete output modes, are supported. This should be used for debugging purposes on low data volumes as the entire output is collected and stored in the driver’s memory. Hence, use it with caution.
 
writeStream
    .format("memory")
    .queryName("tableName")
    .start()


Some sinks are not fault-tolerant because they do not guarantee persistence of the output and are meant for debugging purposes only. See the earlier section on fault-tolerance semantics. Here are the details of all the sinks in Spark.

Sink
Supported Output Modes
Options
Fault-tolerant
Notes
File SinkAppendpath: path to the output directory, must be specified. 

For file-format-specific options, see the related methods in DataFrameWriter (Scala/Java/Python/R). E.g. for "parquet" format options see DataFrameWriter.parquet()
Yes (exactly-once)Supports writes to partitioned tables. Partitioning by time may be useful.
Kafka SinkAppend, Update, CompleteSee the Kafka Integration GuideYes (at-least-once)More details in the Kafka Integration Guide
Foreach SinkAppend, Update, CompleteNoneDepends on ForeachWriter implementationMore details in the next section
Console SinkAppend, Update, CompletenumRows: Number of rows to print every trigger (default: 20) 
truncate: Whether to truncate the output if too long (default: true)
No
Memory SinkAppend, CompleteNoneNo. But in Complete Mode, restarted query will recreate the full table.Table name is the query name.


https://stackoverflow.com/questions/28700624/spark-submit-scheduling-in-cron


crontab -e 를 통해서 script 를 정기적으로 돌릴때,


#!/bin/sh

spark submit >> 동작안함


#!/bin/bash 
/경로/spark-submit >> 동작함


아래와 같이 bash 로 수정하고 실행시키면 동작한다.


bash is the most common shell used as a default shell for users of Linux systems. It is a spiritual descendent of other shells used throughout Unix history. Its name, bash is an abbreviation of Bourne-Again Shell, an homage to the Bourne shell it was designed to replace, though it also incorporates features from the C Shell and the Korn Shell.


/bin/sh is an executable representing the system shell. Actually, it is usually implemented as a symbolic link pointing to the executable for whichever shell is the system shell. The system shell is kind of the default shell that system scripts should use. In Linux distributions, for a long time this was usually a symbolic link to bash, so much so that it has become somewhat of a convention to always link /bin/sh to bash or a bash-compatible shell. However, in the last couple of years Debian (and Ubuntu) decided to switch the system shell from bash to dash - a similar shell - breaking with a long tradition in Linux (well, GNU) of using bash for /bin/sh. Dash is seen as a lighter, and much faster, shell which can be beneficial to boot speed (and other things that require a lot of shell scripts, like package installation scripts).


If your script requires features only supported by bash, use #!/bin/bash.

But if at all possible, it would be good to make sure your script is POSIX-compatible, and use #!/bin/sh, which should always, quite reliably, point to the preferred POSIX-compatible system shell in any installation.

파일전송을 KAFKA PRODUCER 쪽으로 보내기위한 AGENT 단의 구현이 필요 했다.


보통 JDBC 등의 소스에서는 kafkaconnector 가 지원하는데,


단순 경로에서 spool 하여 Producer 쪽에 쏴주는 kafkaconnector 는 존재 하지 않기 때문에 ,

직접구현하고 github 에 구현하였다.


https://github.com/Sangil55/SimpleFileConnetor


'spark,kafka,hadoop ecosystems > apache.kafka' 카테고리의 다른 글

kafka connect  (0) 2018.11.20
kafka vs flink vs esper vs storm vs spark  (0) 2018.11.20
kafka-개요  (0) 2018.11.20
kafka 로그 설정 에 대하여  (0) 2018.10.17
1. Kafka 설치 및 producer & Consumer test  (0) 2018.06.21

출처 : https://kafka.apache.org/quickstart /


궁극적으로 BIG DATA 실시간 분석이 목적인데,


Spark Streaming 하기 위한 전단계 중 Kafka Infra 를 앞단에 놓고 실시간 Streaming 을 사용 하여 구현하게된다.


Kafka 는 개략적으로

이런 모양을 하고 cluseter, 즉 broker 가 중간 역할을 하여 data 를 전달 한다.


프로듀서 - 컨슈머 동작을 하기위해선 아래 순서로 설치한다.

1.일단 KAFKA 설치 (직접설치 또는 ambari 등을 이용)


2.zookeeper 환경설치 (직접설치 또는 ambari 등을 이용)


3.Kafka 경로의 server.properties 파일에서 설정 확인


Listener = PLAINTEXT://localhost:6667 또는 9092포트

advertisment.Listener(deprecated)

>>으로 설정 이후 Zookeeper 는 6667 포트를 기준으로 consumer / producer 를 보내게 된다.

default.replication.factor = 1

offsets.topic.replication.factor  = 1 (3 으로설정되어있으면 consumer 가 topic 이 3개 기준으로 동작하기 때문에 추후 조정)


4. 토픽 생성 

/usr/bin/kafka-topics.sh --create --zookeeper localhost:6667 --replication-factor 1 --partitions 1 --topic test


5. 프로듀서 테스트

/usr/hdp/2.6.5.0-292/kafka/bin/kafka-console-producer.sh --broker-list swinno01.cs9046cloud.internal:6667 --topic Hello 


6.컨슈머 테스트

/usr/hdp/2.6.5.0-292/kafka/bin/kafka-console-consumer.sh --zookeeper swinno01:2181 --topic Hello

/usr/hdp/2.6.5.0-292/kafka/bin/kafka-console-consumer.sh --bootstrap-server swinno01.cs9046cloud.internal:6667 --topic Hello --from-beginning 


이때 컨슈머가 제대로 윗라인으론 동작을 하는데, 아래 bootstrap 옵션으로 동작 안하는 경우가있다.

그땐 다수의 삽질과 / 구글링등을 통해서 아래를 확인해보자

a.broker 의 netstat -tnlp 를 통해 6667 (9092) 포트가 오픈되있는지 확인

b.실행환경에서 브로커ip:port 로 telnet 확인

c. zookeeper 스크립트를 통한 브로커 상태확인

/usr/hdp/2.6.5.0-292/kafka/bin/zookeeper-shell.sh localhost:2181   

 get /brokers/ids/1001  (ids num 은 확인필요)

d. topic/ broker 모두 삭제후 KAFKA 재시작

e.  offsets.topic.replication.factor  = 1 확인


연결이 상태가 안 좋다면 아래글 참고

https://github.com/wurstmeister/kafka-docker/wiki/Connectivity


지금도 forum / stackoverflow 등에는 위의 이유등으로 컨슈머가 bootstrap 에서 안된다는 이슈는 꾸준히 나오고있다 -_-ㅋ


이런 설정문제이거나/ 연결문제이거나 / 브로커 잔재 문제이거나


컨슈머까지 스크립트에서 동작하는것을 확인하면

spark 를 이용한 streaming 하기 위한 전단계 까지 완료 !


'spark,kafka,hadoop ecosystems > apache.kafka' 카테고리의 다른 글

kafka connect  (0) 2018.11.20
kafka vs flink vs esper vs storm vs spark  (0) 2018.11.20
kafka-개요  (0) 2018.11.20
kafka 로그 설정 에 대하여  (0) 2018.10.17
Kafka Connector , Simple Connector 구현  (0) 2018.07.16

+ Recent posts